Wednesday, June 12, 2013

Creating a Team Project in TFS 2012

In this post we are see how to create new team project in Team foundation server 2012 from Visual Studio 2012.


  • Open the Visual Studio 2012
  • In the Connection to Team Project dialog box, click Servers.
  • In the Add/Remove Team Foundation Server dialog box, click Add.
  • In the Add Team Foundation Server dialog box, provide the details of your TFS instance, and then click OK.

  •      In the Add/Remove Team Foundation Server dialog box, click Close.
  •      In the Connect to Team Project dialog box, select the TFS instance you want to connect to, select the team project collection you want to add to, and then click Connect.


  •      In the Team Explorer window, click New Team Project.


  • In the New Team Project dialog box, provide a name and a description for the team project, and then click Next.


  • On the Select a Process Template page, select the process template that you want to use to manage the development process, and then click Next.


  • On the Team Site Settings page, leave the default settings unchanged, and then click Next.
  • On the Specify Source Control Settings page, leave the default settings unchanged, and then click Next.
  • On the Confirm Team Project Settings page, click Finish.
  • When the new team project is successfully created, on the Team Project Created page, click Close.
Now Team project is created , now we will add some users to Team Project. this is also can be  done through Visual Studio 2012

Add Users to a Team Project

  •      Open VS 2012 >> go to team explorer >> click Home Button >> Settings
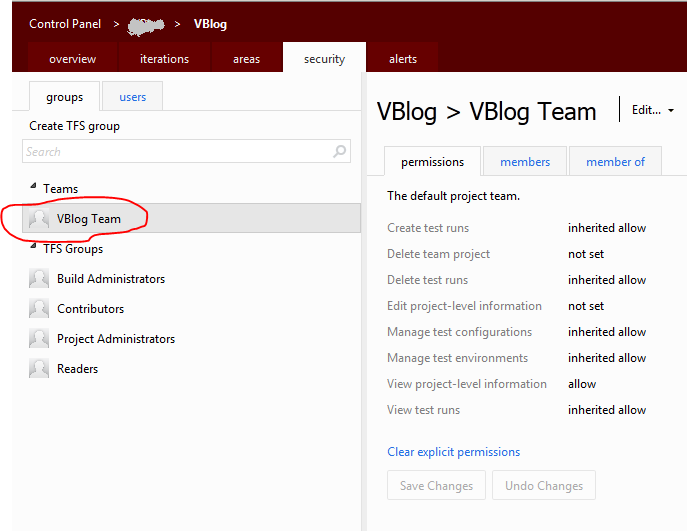
             Substitute the values for "TFS Server", ""Team Project Collection" and " Team Project Name".

  • Sign In As “Admin User” , or else you will not have enough privilege to assign the team members

  •      Click Teams Group (VBlog Team) and add members one by one.
  • Add the same group("VBlog Team") to “Contributors”, or else they can’t add, modify …etc. 
                once we have added  members to tha VBlog Team , add that team to other gorups ("Contributors",   "Reader" and etc)

Thursday, June 6, 2013

Publish Window Azure cloud Services into Window Azure

  • Create window azure cloud services and add web role
a.       Create new Project (File --> New --> Project --> Cloud --> Windows Azure Cloud Services)


  •  Click ok,

Select ASP.Net Web Role and click “>” , then click OK.

  •       Modify the web project
         Add some pages (Home.aspx , Default.aspx)


  •       Modify the cloud project
         For the moment keep it as default 

  •       Publish the web role

  •       If it is the first time you are connecting with window azure, you have to click “Sign in to download credentials” to download the subscription then import it via “import” button.
            Or else, choose your Subscription from dropdown list.


  •        Click next


Cloud Service – Select the correct Cloud Service, or else create new one
Environment – Select production or Staging
Build Configuration – select release or debug
Service configuration – select cloud or local

Go to Setting to configure remote desktop connections
Give username and password

  • Go to Advanced settings tab


Give a name to deployment label – just a name

Storage account – select one , if you don’t have anything , create new one

  • Click Next


You can check the status of publish by “Window Azure Activity Log” window in visual studio (Enable it, if it is not exist)


  • Once the publish get succeed , you will get like this (Check the Window Azure Activity Log window)


Finally , You can go to that URL and check whether everything works fine or not.

Tuesday, June 4, 2013

Register Client Id and Client Secret for Provider Hosted Sharepoint Apps


     Client Id and Client Secret is used to connect Window azure web sites / azure cloud services with Office 365 App (Provider Hosted Apps).
  1.      Generate Client Id and Client Secret from Sharepoint ( or Office 365) site
         Navigate to https://entc.sharepoint.com/_layouts/15/appregnew.aspx - this is office 365 site.     

         You need to generate AppId and App Secret and enter hosting domain and Redirect url.


          2.  Add Client Secret to App manifest (Sharepoint app --> AppManifest.xml , right click on it and select   "View Code")


           Put the Generated App ID in to Client ID Section


           3. Client Secret to Web.Config

         Then open the web config and put client secret and AppId to Web Config
     <appSettings>
       <add key="ClientId" value="ef07a76d-1df5-4831-8417-7f7a2778238a" />
       <add key="ClientSecret" value="U4urjkfT+jEhNAgIkCtM4Kl9uP6m9btx8oCvsb12KlA=" />
     </appSettings>

  4. Update ID and secret value in window azure Site

         We have to select the correct place to store these client Id and client Secret in window azure.
                
                a.       If the provider is Azure Web Site
                      Select the web site which we are going to host our site.Create new if you don’t have one


                    Then go to “CONFIGURE” à “App Settings”


b.       If the Provider is Azure Cloud Service
Then you need to remote login to the machine and put the web config manually.


Hosting Normal ASP.Net WebSite in Window Azure Web Site


  •      Create normal Asp.Net project and check all functionalities before hosting into Window azure Web Site
  •      Pubilsh it

  •     If you already have a profile , select that or else Import New Profile From window Azure.

  •      Click "Import"

  •      Click "Add Windows Azure Subscription"

  •       Click "Download Subscription file". If you have already connect with Window Azure Account , automattically download page will be opened and it will be started to download that file. If you haven't configure the connection you have to configure it first. once the download finish , browse that file, then click "Import".

  •      Then select the appropriate azure the Web Sites. If you don’t have any azure web site , go to manage portal and create new Azure Web Sites.  then get the latest subscription file and select the newly created site as Window Azure Web Site.

  •      Then select the appropriate azure the Web Sites. If you don’t have any azure web site , go to manage portal and create new Azure Web Sites.  

  •       Click "Next"

  •     Select the Correct Configuration and click Next,

  •      If You want , You can click “Start Preview” to check

  •     Everything Seems ok, so it is time to publish the site into Window Azure. Finally Click "Publish".

  • Once you get the success message you can go publish site link via browser. (The URL will be displayed in Output Window)

Call Rest Service from C#


There are lots of ways to call REST Services in your applcation, you can either use Javascript (JQuery Functions) or C# . here i am not going to compare anything. If you want to know how to call using JQuery go here. in this post we are going to look how to call REST Services using C#

Invoking Rest Services from C# Application

public class ServiceConnector
    {
        string EndPoint ;
        string Method ; 
        string ContentType ;
        EventLogger logger ;

        public ServiceConnector(string endpoint,string method, string contenttype,string logName)
        {
            this.EndPoint = endpoint;
            this.Method = method;
            this.ContentType = contenttype;
            logger = new EventLogger(logName);
        }
        public string MakeRestRequest(string parameters, string PostData)
        {
            var request = (HttpWebRequest)WebRequest.Create(EndPoint + parameters);
            logger.WriteToEventLog("Calling Services...");
            request.Method = Method;
            request.ContentLength = 0;
            request.ContentType = ContentType;

            if (!string.IsNullOrEmpty(PostData) && Method == "POST")
            {
                var encoding = new UTF8Encoding();
                var bytes = Encoding.GetEncoding("iso-8859-1").GetBytes(PostData);
                request.ContentLength = bytes.Length;

                using (var writeStream = request.GetRequestStream())
                {
                    writeStream.Write(bytes, 0, bytes.Length);
                }
            }
           
            using (var response = (HttpWebResponse)request.GetResponse())
            {
                var responseValue = string.Empty;

                if (response.StatusCode != HttpStatusCode.OK)
                {
                    var message = String.Format("Request failed. Received HTTP {0}", response.StatusCode);
                    logger.WriteToEventLog("Web Service Call Failed. More Details : " + message);
                    throw new ApplicationException(message);
                }

                // grab the response
                using (var responseStream = response.GetResponseStream())
                {  
                    if (responseStream != null)
                        using (var reader = new StreamReader(responseStream))
                        {
                            responseValue = reader.ReadToEnd();
                        }
                    logger.WriteToEventLog("Web Service Call succeed, response value is " + responseValue);
                }

                return responseValue;
            }
        }
    }

Check whether Service call work fines or not by creating console application.
use this code to call that function


ServiceConnector Service = new ServiceConnector("Enter your Service EndPoint here", "Enter Method", "Enter ContentType", "MyServiceLog");
String response = Service.MakeRestRequest("Pass your parameters", "Pass your PostData, keep it as empty if you do GET");